Preface
Cocoaods在iOS开发者中使用非常广泛,类似Maven,是用来管理三方库的一个工具,项目用Cocoapods来管理省去了很多事,Cocoapods不仅可以用来管理三方库,也可以自己搭建一个仓库给自己的项目使用,可以是私有库也可以是公有库,可以原码依赖,也可以是二进制文件依赖,原码依赖常见的都是Open Source Library,Github上的很多开源库,比如AFNetworking等,如果提供商业的SDK一般不会用原码,基本都是二进制库(Binary),今天就来说说如何用Cocoapods发布一个Binary iOS Framework
How Cocoapods Works
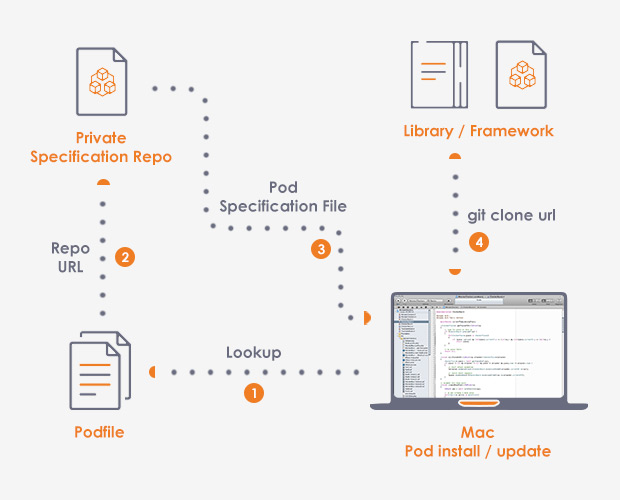
下面这张图展示了Cocoapods是如何工作的:

当我们在执行install命令:
pod install
或者在执行update命令时:
pod update
Cocoapods首先从本地的Podfile中查找Repo,也就是Podfile中的 source,其实就是个Git的Repository,Cocoapods先执行了一个git命令去更新Git Repository:
git update
然后在这个Git Repository中找到对应的LibaryName.podspec文件,再从LibraryName.podspec中去查找内容,这里的内容如前面所说可能是一个git repository,也可能对应的是一个Binary地址,最终集成到项目中.
How to Publish a Binary iOS Framework using CocoaPods
上面只是简单说了Cocoapods是如何工作的,下面就说本篇的重点,如何用Cocoapods发布一个Binary Library.
当然前提是假定Cocoapods已经安装,如果还没安装Cocoapods,首先需要安装Cocoapods,
Execute the following on your terminal to get the latest stable version:
sudo gem install cocoapods
Add –pre to get the latest pre release:
sudo gem install cocoapods --pre
Create a Project
Create a new Xcode project for your framework and select the Cocoa Touch Framework template:

Enter a Product Name and choose Swift as the project language. For the purpose of writing this guide, I’ve chosen to create a framework called EasySDK that exposes a method which simply prints a String to the console.
Develop Functionality
Time to actually write and expose some APIs in your framework.
Create a file called EasySDK.swift within the EasySDK group, with the following contents:
//
//  EasySDK.swift
//  EasySDK
//
//  Created by Chris on 2019/5/11.
//  Copyright © 2019 iEasyNote. All rights reserved.
//

import Foundation

public class EasySDK {
    public class func logToConsole(msg: String) {
        print(msg);
    }
}
Note that you must explicitly label all classes and methods you wish to expose in your framework with the
publickeyword, otherwise, they won’t be accessible in other projects.
Generate Universal Framework
打个Universal的包出来,Universal就是指既支持i386 x84_64(模拟器),也支持arm64 armv7(真机)
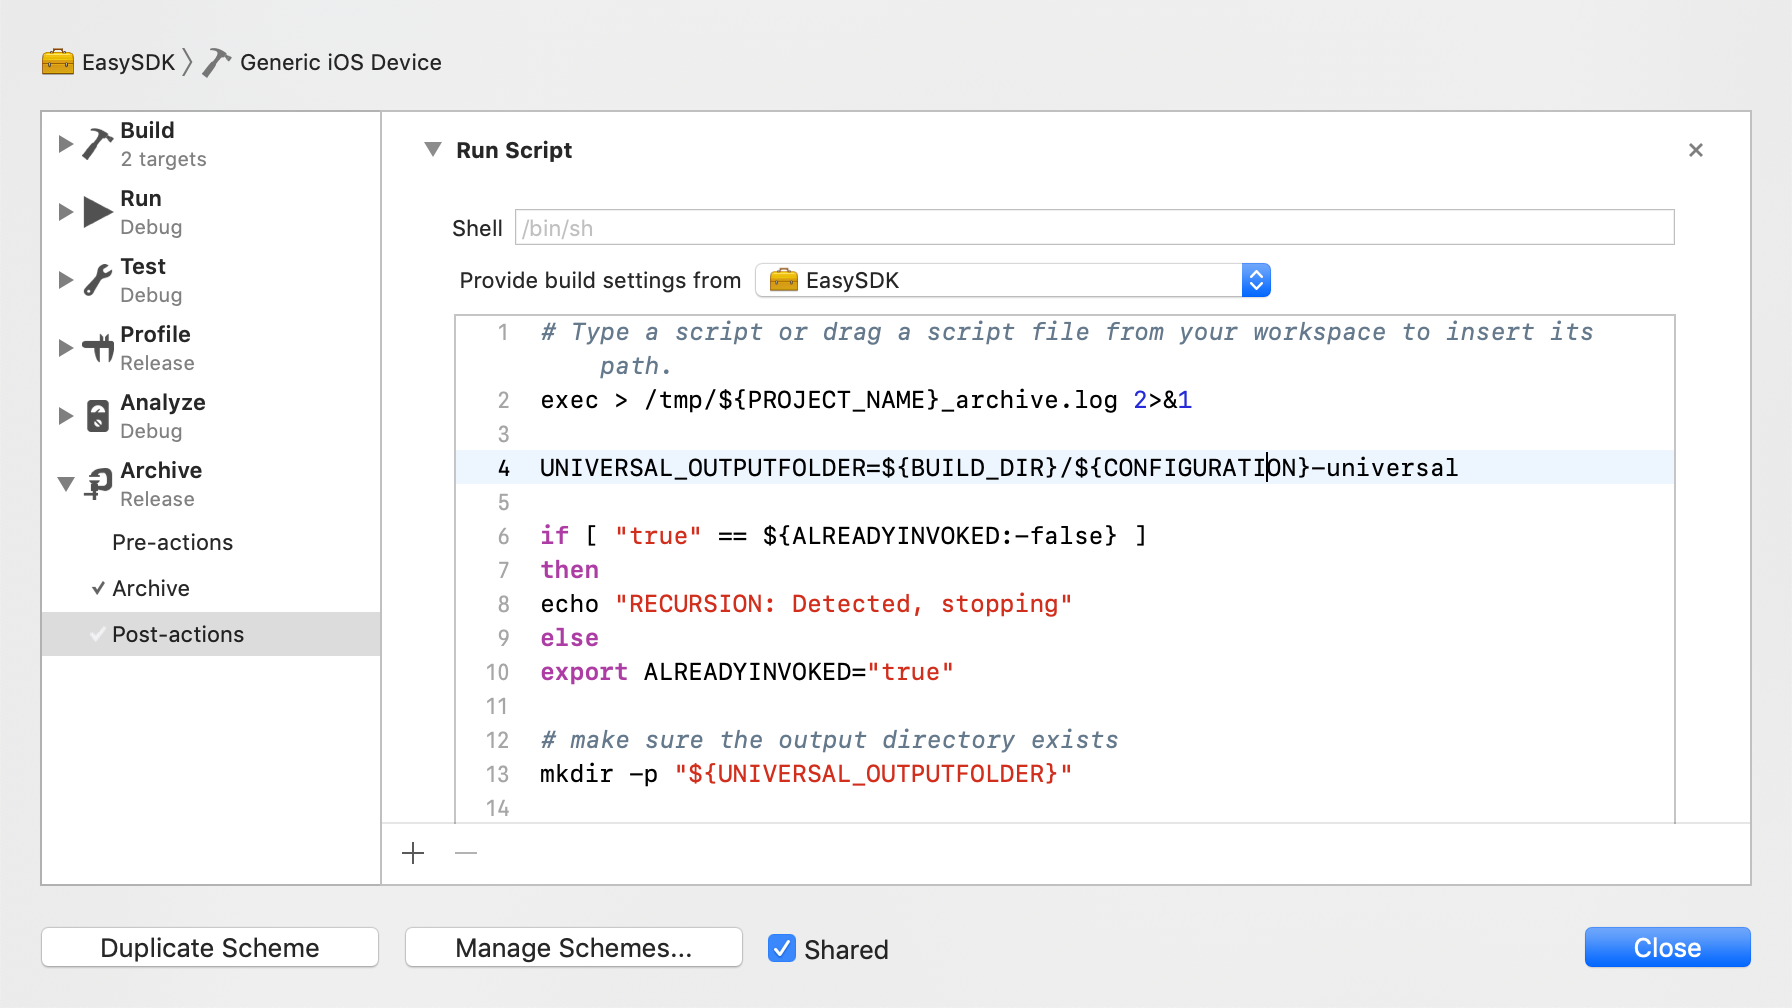
至于如何打一个Universal包方法有多种,Xcode Archive, xcodebuid,如果是Xcode archive默认情况是不支持i386 x86_64 的,需要配置Scheme的Archive中的Post-actions,
1. Archive
To have Xcode run the script after archiving automatically, select the EasySDK target, click Product -> Scheme -> Edit Scheme (or Cmd + Shift + <), and configure a Run Script post-action for the Archive command:

Git hub上这有个脚本,我自己试了一下有问题,大家可以自己试试,
2. Xcodebuild
universal-framework.sh:
#!/bin/sh

PROJECT_NAME=EasySDK
TARGET=EasySDK
CONFIGURATION=Release
BUILD_DIR=build

UNIVERSAL_OUTPUTFOLDER=${BUILD_DIR}/${CONFIGURATION}-universal

# make sure the output directory exists
mkdir -p "${UNIVERSAL_OUTPUTFOLDER}"

# Step 1. Build Device and Simulator versions
xcodebuild -target "${TARGET}" ONLY_ACTIVE_ARCH=NO -configuration ${CONFIGURATION} -sdk iphoneos  BUILD_DIR="${BUILD_DIR}" BUILD_ROOT="${BUILD_ROOT}" clean build OTHER_CFLAGS="-fembed-bitcode" -UseModernBuildSystem=NO
xcodebuild -target "${TARGET}" ONLY_ACTIVE_ARCH=NO -configuration ${CONFIGURATION} -sdk iphonesimulator BUILD_DIR="${BUILD_DIR}" BUILD_ROOT="${BUILD_ROOT}" clean build -UseModernBuildSystem=NO

# Step 2. Copy the framework structure (from iphoneos build) to the universal folder
cp -R "${BUILD_DIR}/${CONFIGURATION}-iphoneos/${PROJECT_NAME}.framework"* "${UNIVERSAL_OUTPUTFOLDER}/"

# Step 3. Create universal binary file using lipo and place the combined executable in the copied framework directory
lipo -create -output "${UNIVERSAL_OUTPUTFOLDER}/${PROJECT_NAME}.framework/${PROJECT_NAME}" "${BUILD_DIR}/${CONFIGURATION}-iphonesimulator/${PROJECT_NAME}.framework/${PROJECT_NAME}" "${BUILD_DIR}/${CONFIGURATION}-iphoneos/${PROJECT_NAME}.framework/${PROJECT_NAME}"
新建一个: universal-framework.sh将上面的脚本复制,并存放在跟EasySDK.xcodeproj同一级的目录中
chmod a+x ./universal-framework.sh
./universal-framework.sh
运行完成之后,在 bulid/Release-universal/目录下会有一个EasySDK.framework,
Verify Framework
验证一下EasySDK.framework,看看是否是Universal Framework,You can verify that EasySDK.framework is indeed a universal framework by running:
file build/Release-universal/EasySDK.framework/EasySDK
Output:
build/Release-universal/EasySDK.framework/EasySDK: Mach-O universal binary with 4 architectures: [i386:Mach-O dynamically linked shared library i386] [arm64:Mach-O 64-bit dynamically linked shared library arm64]
build/Release-universal/EasySDK.framework/EasySDK (for architecture i386):      Mach-O dynamically linked shared library i386
build/Release-universal/EasySDK.framework/EasySDK (for architecture x86_64):    Mach-O 64-bit dynamically linked shared library x86_64
build/Release-universal/EasySDK.framework/EasySDK (for architecture armv7):     Mach-O dynamically linked shared library arm_v7
build/Release-universal/EasySDK.framework/EasySDK (for architecture arm64):     Mach-O 64-bit dynamically linked shared library arm64
Create a Zip Archive
The easiest way to make your framework and license available with your CocoaPod is to archive them inside a .zip, upload it to your server, and link to it using the s.source parameter in the .podspec file.
Create the EasySDK.zip file by running the following command in your project directory:
zip -r EasySDK.zip LICENSE EasySDK.framework
现在将EasySDK.zip上传到你的文件服务器,比如最终的访问地址是:
http://www.example.com/sdk/1.0.0/EasySDK.zip
Create Pod Spec
Execute command:
pod spec create EasySDK
Edit EasySDK.podspec:
Pod::Spec.new do |spec|
  spec.name         = "EasySDK"
  spec.version      = "1.0.0"
  spec.summary      = "EasySDK binary framework pod."
  spec.description  = <<-DESC
        This is a binary framework using cocoapods
                   DESC
  spec.homepage     = "http://www.example.com/EasySDK"
  spec.license      = "MIT (example)"
  spec.author             = { "Name" => "easysdk@example.com" }
  spec.source       = { :http => 'http://www.example.com/sdk/1.0.0/EasySDK.zip' }
end
Register a Trunk Account
发布到Cocoapods repository,首先要注册一个trunk account
pod trunk register you@email.com 'Full name' --description='your description'
Then, check your e-mail for a confirmation link and click it.
Your Trunk account is now activated and you can finally publish your CocoaPod!
Publish the Pod repository
pod trunk push EasySDK.podspec
这就成功发布到Cocoapods respository了
Publish to private a repository
上面是发布到Cocoapods repository,下面说一下发布到Private repository,主要有以下几步
Step 1: Create your Podspec Repository on Github
如果是发布到自己的私有仓库,先创建一个私有的Pod repository,这里拿GitHub举例,
在GitHub上创建一个自己的私有仓库,并添加一个README.md
echo “# your-specs” >> README.md
git init
git add README.md
git commit -m “first commit”
git remote add origin https://github.com/you/your-specs.git
git push -u origin master
Step 2: Add your Private Repository to your CocoaPods Installation
Once you’re done with creating a spec repository in Github, you only need to run the following command in the terminal to add your private repository to the cocoapods installation.
pod repo add [REPO_NAME] [SOURCE_URL]
上面的代码就是将你的git repository添加到~./cocoapods/repos目录中,也就相当于git clone source_url,举个例子:
pod repo add your_repo https://github.com/you/your-specs.git
运行之后,你会在~/.cocoapods/repos/目录下看到your_repo这个目录,这里面就是你的pod repo,后面提交.podspec就是从这个目录提交的,如果一切正常没有出错,接下来就可以link你的repo了:
cd ~/.cocoapods/repos/REPO_NAME
pod repo lint .
这里的REPO_NAME就是上面的your_repo,现在我们的podspec repository就已经好了
Step 3: Push your Pod in the Specs Repo
现在就是发布Binary framework了,执行命令:
pod repo push [REPO_NAME] [POD_NAME].podspec
这里同上REPO_NAME就是your_repo,[POD_NAME].podspec就是上面的EasySDK.podspec
pod repo push your_repo EasySDK.podspec
Step 4: Share It with Your Team
If you want other members of your development team to be able to use this pod then they should have access to the spec repo, and they must add the private repo to their local Cocoapods installation with the command:
pod repo add [REPO_NAME] [SOURCE_URL]
这里同上举例,需要用到你的EasySDK的开发者,执行命令:
pod repo add your_repo https://github.com/you/your-specs.git
其实这一步也不是必须的,直接在项目的Podfile里面指定source也可以:
platform :ios, '9.0'

source 'https://github.com/CocoaPods/Specs.git'
source 'https://github.com/you/your-specs.git'

target 'ProjectName' do
    pod 'EasySDK', '~> 1.0.0'
end
The end!